The Square-1 puzzle is unique in that its layers—top, middle, and bottom - are split diagonally, allowing for a "slice" move. This middle layer is a divider, and due to its simple structure solving it isn't as crucial. Most of the solving process focuses on the top and bottom layers.
At a beginner level the Square-1 is solved in the following 6 Steps:
- Get the puzzle into a Cube Shape
- Orient Corners (CO)
- Orient Edges (EO)
- Permute Corners (CP)
- Permute Edges (EP)
- Fix Parity
All the images are shown in pairs. The left side shows the TOP and the right side shows the BOTTOM.

STEP 1 - Get the puzzle into a Cube Shape.
The goal of the first part is to get all eight edge pieces next to each other in the top layer.- Hold the puzzle so that the middle layer (with two pieces) is facing you. The small square in the middle layer should be on the left side.
- The middle layer allows for a "slice move", where the right-hand side of the puzzle can be rotated 180 degrees (a half-turn). This is how you’ll move pieces between the top and bottom layers.
- Here’s the trick: The left side doesn't move, so store your edges there. Move pieces from the right hand, bottom layer to the top layer with the “slice”.
- Keep most of the edges on the top layer on the left side. Rotate the bottom layer to put edges in the right side. Then slice to move the bottom edges to the top alongside the ones you already have.
This step is intuitive; you can do it for sure but it does take a little practice. The following examples show you how to get the last couple of edges in place:
This first example is if you have seven edges together and one is left between two corners.


 After you've completed the setup moves on your Square-1 puzzle and you're ready to return it to a cube shape.
Holding the Puzzle:
Top Layer Orientation: The top layer should have eight edges, meaning it's almost a full circle. Adjust the top layer so that there are four edges either side of the slice as indicated above.
Bottom Layer Orientation: The bottom layer should have six corners, with three corners on each side of the slice as indicated above.
Middle Layer Setup: Ensure that the middle layer has two sides (edges) facing you, with the smaller square (a piece that is thinner than the others) positioned on the left side.
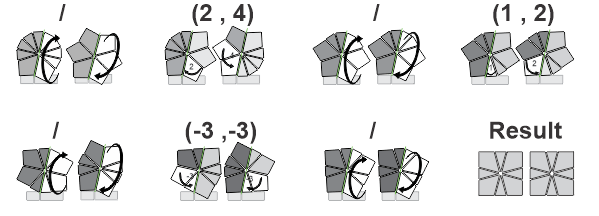
Perform the following algorithm to turn the Sq-1 into a cube:

STEP 2 - Orient Corners (CO)

In this step we will swap two corners until we have four Yellow corners in the Top and four White corners in the bottom.
Setup for the Swap:
Top Layer (Yellow): Rotate the top layer so that there’s a white corner in the front right position.
Bottom Layer (White): Rotate the bottom layer so that a yellow corner is in the front right position.
This setup places both corners you want to swap in the front right positions of the top and bottom layers, respectively.
To swap these two corners, use the following algorithm:

STEP 3 - Orient Edges (EO)

The goal of this step is to move all the Yellow edges in the TOP face, whilst maintaining the square shape for the top and bottom layers.
Setup for the Swap:
Top Layer (Yellow): Rotate the top layer so that you have a WHITE edge in the right position.
Bottom Layer (White): Rotate the bottom layer so that you have a YELLOW edge in the back position.
Perform the algorithm below to swap the two edges

Repeat this process until you have all four YELLOW edges in the top layer.
STEP 4 - Permute Corners (CP)

If you have two corners with matching side colors ("headlights"):Rotate the top layer so that the two matching corners (the "headlights") are positioned on the back side of the puzzle.
If you do NOT have any matching corners ("no headlights"):Perform the algorithm below. After completing it, you should have one set of "headlights.”
Once you have one set of headlights, rotate the top layer so that these "headlights" are positioned on the back side of the puzzle.

STEP 5 - Permute Edges (EP

You're now working on swapping two edges in the top and bottom layers simultaneously to either solve all edges or leave only two edges to swap.
Setup for Swapping Edges:
Top Layer (Yellow):Rotate the top layer so that the edge on the right matches the corners on the front of the puzzle.
Bottom Layer (White):Rotate the bottom layer so that the edge on the left matches the corners on the front of the puzzle.
Repeat this process until either: All edges are solved, or Only two edges remain unsolved in the entire cube.
If you find yourself with three unsolved edges, you will need to perform the algorithm twice: First, solve one edge. This will also swap two solved edges in the opposite layer, but they will be swapped back in the second step.
Then, you'll be left with two edge pairs to swap. Perform the Setup step above before executing the algorithm below again.

Repeat this process until you have either all edges solved OR only two edges for the whole cube swapped.
STEP 6 - Fix Parity

If you only have two edges swapped then you have edge parity.
Hold the cube with the two swapped edges in the top layer. on the front and right sides.
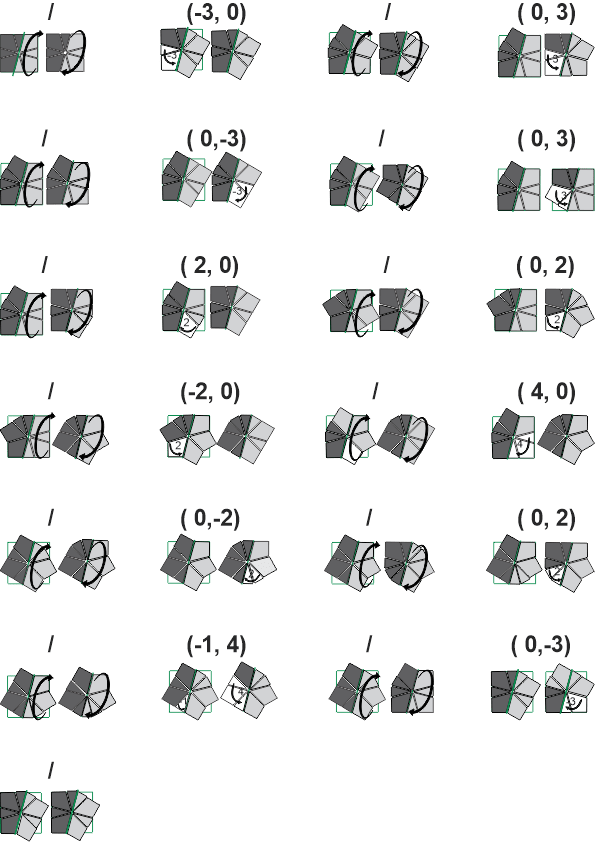
The steps to swap only two edges is:
/ (-3,0) / (0,3) / (0,-3) / (0,3) / (2,0) / (0,2) / (-2,0) / (4,0) / (0,-2) / (0,2) / (-1,4) / (0,-3) /

ADDITIONAL - Fix Misaligned middle layer
To fix the misaligned middle layer of the Square-1 without disturbing the already solved top and bottom layers, you can follow these specific steps. These can be performed at any stage of the solve without affecting the progress you've made in solving the top and bottom.
SWAP TOP AND BOTTOM LAYER
When solving a Square-1 puzzle, there are times when you need to swap the top and bottom layers to bring the puzzle into a better state for solving, particularly during corner permutation. Swapping the layers is helpful when the corners of both layers need to be moved or swapped without disturbing their order or orientation.Here’s an algorithm that will swap the top and bottom layers of the Square-1 puzzle without messing up their positions:


